In this post I'll show you how to clean your headlamps from inside and outside.
In my case the headlamp became a bit yellow from the inside , so I had to disassemble my headlamp and get to the inside part.
What we will do in this post is to remove the headlamp and disassemble it.
For example I'm posting the process for the driver side headlamp, it's the same operation on the other side.
For this operation you will need:
1.screwdriver
2. Super 7 glue (Or any other transparent glue)
3. Sandpaper of 600 - 1200 -2000 - 2500 or more by your choice.
4. socket wrench
5. hair dryer
6.Varnish or a gloss clear for plastic
Remove the battery cover to make more space for the process.
1.The first part is to take the headlamp out by removing the front "SAAB" grill by removing it with a screwdriver:
(Careful take out the bolt and the washer).
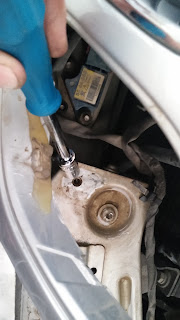
2. Remove the bolt at the top of the headlamp:
3.Now there's a small clips behind the headlamp that hold the Signal turn light in place.
just push it down and pull the Turn lamp out.
The clips marked in this photo as number 4.
Credit to the WIS for the photo.
Disconnect the Turn lamp connector.
There is another bolt on the headlamp under the turn lamp that holds the lamp in place, remove it.
Now it's time to take out the headlamp and disconnect the power connector.
Now is the tricky part is to take apart the plastic cover of the lamp, for this I recommended 2 people to do together.
The plastic cover of the headlamp is glued so you need to use the hair dryer to melt the glue.
1 Person will heat the glue with the hair dryer, and the other will take the plastic cover out all the way around the lamp very carefully without breaking anything by using a screw driver.
I filmed short video from the process to illustrate how it should be done.
The next part will be the restoration part of the plastic cover.
For the restoration part I recommend watching ChrisFix video on YouTube, link is below.
The process of the restoration may take a long time but it's worth it.
(In my case I did this from both sides of the headlamp).
This is how it should look:
Before:
After:
So when you happy with your result's and the varnish is dry enough you can put the headlight plastic cover back in place, by using Super7 or any other strong glue apply the glue all the way around the headlight, leave it to dry for the amount of time you need by the kind glue your using.
When the cover is glued the headlamp is ready to assembly back on the car.
The assembly part is very easy, just reverse the disassemble part.
The headlight is look much better now!
Very nice project for bring some good old looking for our Saabs.
Result:
The right headlight is after, the left is before:
Result:
The right headlight is after, the left is before:
Yaari


