Tuesday, October 6, 2015

Headlights restoration


Hello,
In this post I'll show you how to clean your headlamps from inside and outside.
In my case the headlamp became a bit yellow from the inside , so I had to disassemble my headlamp and get to the inside part.

What we will do in this post is to remove the headlamp and disassemble it.
For example I'm posting the process for the driver side headlamp, it's the same operation on the other side.

For this operation you will need:
1.screwdriver
2. Super 7 glue (Or any other transparent glue)
3. Sandpaper of 600 - 1200 -2000 - 2500 or more by your choice.
4. socket wrench
5. hair dryer
6.Varnish or a gloss clear for plastic

Remove the battery cover to make more space for the process.

1.The first part is to take the headlamp out by removing the front "SAAB" grill by removing it with a screwdriver:


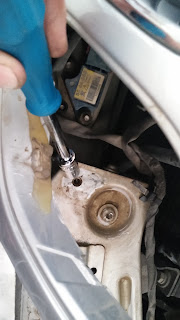
Under the grill you will notice the bolt that holds the headlamp in place.
(Careful take out the bolt and the washer).


2. Remove the bolt at the top of the headlamp:


3.Now there's a small clips behind the headlamp that hold the Signal turn light in place.
just push it down and pull the Turn lamp out.
The clips marked in this photo as number 4.

Credit to the WIS for the photo.


Disconnect the Turn lamp connector.
There is another bolt on the headlamp under the turn lamp that holds the lamp in place, remove it.

Now it's time to take out the headlamp and disconnect the power connector.


Now is the tricky part is to take apart the plastic cover of the lamp, for this I recommended 2 people to do together.
The plastic cover of the headlamp is glued so you need to use the hair dryer to melt the glue.
1 Person will heat the glue with the hair dryer, and the other will take the plastic cover out all the way around the lamp very carefully without breaking anything by using a screw driver.

I filmed short video from the process to illustrate how it should be done.


The next part will be the restoration part of the plastic cover.
For the restoration part I recommend watching ChrisFix video on YouTube, link is below.


The process of the restoration may take a long time but it's worth it.
(In my case I did this from both sides of the headlamp).

This is how it should look:
Before:

After:


So when you happy with your result's and the varnish is dry enough you can put the headlight plastic cover back in place, by using Super7 or any other strong glue apply the glue all the way around the headlight, leave it to dry for the amount of time you need by the kind glue your using.

When the cover is glued the headlamp is ready to assembly back on the car.
The assembly part is very easy, just reverse the disassemble part.

The headlight is look much better now!
Very nice project for bring some good old looking for our Saabs.

Result:
The right headlight is after, the left is before:


Yaari

Saturday, October 3, 2015

Sunroof won't close all the way - Windshield deflector removel


Hello,
If your 9-5 is equipped with a sunroof you may experience a problem of the sunroof closing only half way.
This is a known problem of the 9-5, it happened because of the clips that holding the windshield are broken when they get old and need to be replaced.

So let's start by opening the sunroof all the way.

1. You will notice a small round pin on the connection between the defector to the arm.


Pull the the small round pin and take out the bolt, then the deflector arm should disconnect from the deflector.


2. Now you need to disconnect the other side of the arm by pulling it out with a small screwdriver.
Do it carefully because when it gets old it can break.


3. after you pulled it out just take the arm out carefully.

4. It's time to take out the deflector, you will see that the deflector is hold by 2 plastic clips. it's very simple to take it out by using pliers.

With the pillar ,press on the sides of the plastic and pull the deflector out with left-right protrusions.
Do it on both sides and the deflector will come out.


Now the deflector it out and sunroof will open and close all the way.

____

So now the solutions is by your choice.
When the deflector is out and the sun roof is open, you will notice on a driving of 90Km/h or 56Mph a lot of noise, the deflector is there to make it lot more silence.

So if you're okay with the noises , you can leave it like that and the sunroof will function normally but a bit noisy on driving.

The other solution is to get 2 arms and clips from a junkyard.

As I found, if you want to buy a new arms and clips you must buy the whole wind reflector kit and it's very expensive.

So now my car is without the deflector and I'm working on a better cheap and working solution.
I'll update this post once the solution will be done and fully working.

Hope this will help you,
Yaari.


Monday, September 28, 2015

MAF sensor clean


So what is MAF sensor and why we need to keep it clean on our cars?

A mass (air) flow sensor (MAF) is used to calculate the amount of air coming into the engine, the ecu take the data from the MAF sensor and from the oxygen sensor for making a very accurate air/fuel ratio.

A dirty MAF sensor can cause an unstable RPM on idle, and a system too lean\rich.

So let's get started.

In our Saab this is the MAF sensor:

Now unscrew the two bolts of the rings that hold the MAF in place, You don't need to take out the bolts just make it loose:


The next step will be to pull out the ring from the rubber:


Pull out the back pipe from the MAF:


And then pull out the front pipe and disconnect the cable:


For the cleaning part of the MAF you need to get brake cleaner spray.
just spray on the inside of the MAF to clean all the dirt.


When the MAF is clean from the inside let it dry for 10 minutes.
Now it's time to Assembly by reversing the steps.
**Make sure you put the sensor in the same flow direction** (the flow is to the engine side > )
**Don't forget to connect the cable**

Very simple process and can make you engine idle run smother.

Yaari

Sunday, September 27, 2015

Restore full boost - one way valve

Hi,
Today I'm going to talk about a very common problem on the 9-5 cars, when the car gets a little old the One Way Valves system is starting to fail and when it happens there's a boost leak and your not getting your full boost from the turbo.
The main problem is when the valves are leaking there's a boost coming back to the engine management module and screwing up the calculation of the right amount of boost you need the get.

The lost boost cause because of the old valves are starting to stuck or breaking inside.
There's an easy fix to restore the lost boost to your car.

Also you notice that the stock valves made of plastic, I very recommended to replace them with
aluminium ones.

You can get a little kit for this job at "SaabTuners" includes 2 one way valves and 1 vacuum line, with this kit you will have to use 1 stock vacuum line.
When the kit of the valves is not in stock it won't be shown on the web store.
so if you don't want to wait until it will be in stock you can order separately 2 one way valves and silicone vacuum lines.


What you need:
2 vacuum one way valves. 4mm
2 new vacuum lines. (Saab tuners say you can use the old ones, I prefer to change them to a silicone lines) 4mm


Here's a photo of the aluminium one way valves and the new silicone vacuum hose: (notice on my car the silicone hose are black)


So here is the process:

1. Getting more space and access to get the old valves which located near the steering wheel fluid, this will let you to reach the Valves without much problem.

Here is the bolt holding the steering fluid in place, take it out.


2. There's 2 valves we need to replace, 1 is located near the steering wheel fluid , Wrapped by a black cover, the second one you can find near the right headlight.
the valves connecting to a T splitter, you need to disconnect both of the cables from the T.

The T splitter marked in light blue and the valve near the steering fluid marked in red:


The valve near the right headlight:


3.To disconnect the cables and the valves you will have to cut them to make it easier to pull out.
(Thanks for SaabTuners for the photo)

4. When both of the sides pulled out of the T just pull them out of the other side,
one line is going to the throttle body, and one line is going to the turbo vacuum splitter.

Throttle body vacuum line:

The line to the turbo splitter:


5. After you took out both of the cables it's time to put the new ones with the new valves.
~~IMPORTANT: The one way valve got flow direction, make sure you put it right,
to check to flow direction of your valve just blow into it, if the air can flow freely you got the direction flow.

In our situation the the upper valve is one way to the throttle body, and the lower valve is one way to the turbo, it means the flow direction is away from the T splitter and not into the T splitter.

This is how it should look when you connecting it back: (Thanks for SaabTuners for the photo)


So that is the process, very nice job and restoring your lost boost for a cheap price.
Hope it will help you.

For any question you can contact me on the Facebook page:
https://www.facebook.com/saab95diy?ref=hl

Yaari

Ticking steering wheel

If you got a ticking noise when you move your steering wheel , theres a solution.
Here is an example of the problem:


The solution is very simple, you need to clean and apply new black grease on the steering wheel joint.

1. Take the plastic cover under the steering wheel out, don't forget to disconnect the OBD connector port and the foot light cable.
the plastic is hold with 3 bolts, and the obd2 port hold with 2.

2. Make sure your steering wheel don't move during the job so your wheel alignment will stay good.
Even if it moves it's not a big deal you can adjust it later.


3. Make sure the make a sign on both sides of the Joint so you can put it back the same it was before!!~
There's only 1 Bolt on the Steering wheel joint at the bottom, after you take it out you will have to clean it with a brake cleaner.
Apply grease on the Joint at the 4 points of connection.


Put it back in places and your done.

Very simple.
Yaari.

Turbo replecment

This post is about what you need to know when your converting the turbo from GT17 to TD04.
Turbo replacement
Convert from GT17 to the TD04HL 15T from the AERO model.
~if your converting from the GT17 to the TD04 you can use the original water line for the turbo, you just need new 2 banjo bolts and 4 washers, it's a bit tricky to fit them in place but it's possible.
If you want to make your job eaiser you can purchase a flex teflon water and oil lines for the new turbo from ebay.~

These are the washers, you need 4 of those:


This is the full kit, it will make your life easier:


The difference between the turbo's is:
1. The GT17 water lines bolts are 14'
2. The TD04 water lines bolts are 12'
3. The connection of the Oil line on the td04 is a bit upper from the the GT17.

So to get the new turbo fit right you will need:
2 bolts of 12'
4 washer's to make the bolt fit to the original water line.

Recommended: Make sure to connect all the water and oil lines before fitting the turbo in place, it will be hard to get to the bolts on the turbo when it fitted in place.
So this is basically how to fit the turbo right with the original lines.
For assembly and dissemble I attach a video from YouTube.
for any questions please contact me.

Thanks Remus Eserblom for the YouTube video.


If you have the right tools its not a hard job.

Here is some photos from the process.


Yaari.

Hood struts


Hello,
Lastly my hood struts became weak and my hood starts to fall down.
I bought 2 new struts for the 9-5 at the local parts store, it cost 45$ for 2.

The replacement is very easy:

1. Use some piece of wood or metal to hold the hood open.

2. Pull a screwdriver on the little metal cover and pull it out on both sides of the stunt.


3. To get the new stunt in place just push it in the place at both sides.


Now the hood hold it self and I can work safly again.

Here is a short video of the result:


Very easy job.


Yaari.